Replace Alexa: Build a 100% Offline "Jarvis" with Home Assistant & DeepSeek Voice

It's 2026. Are you still letting Amazon and Google listen to your kitchen conversations? Big Tech voice assistants are getting worse—more ads, missed commands, and constant privacy concerns.
It's time to build your own. An offline, private, highly intelligent "Jarvis" that controls your home and actually understands context, powered by Home Assistant and the DeepSeek AI model.
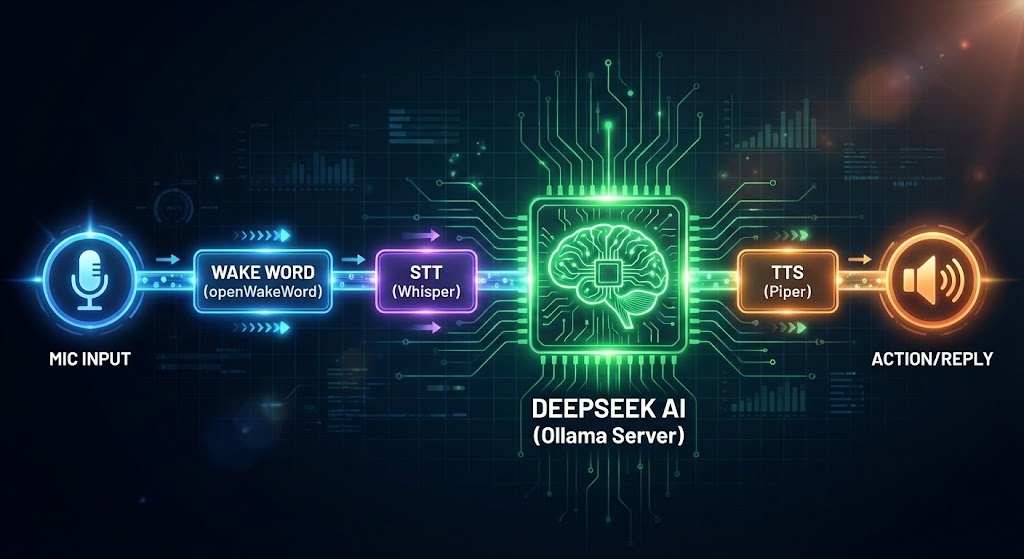
The Architecture: How It Works
Unlike Alexa, which sends your voice to the cloud, everything here happens on your local network. The data never leaves your house.
Mic Input
(openWakeWord)
(Whisper)
(DeepSeek API)
(Piper)
Action/Reply
Prerequisites: You need a running Home Assistant OS server (e.g., on a Raspberry Pi 5 or NUC) and a supported USB microphone or speakerphone connected to it.
1. Prepare the Brain (DeepSeek via Ollama)
Your smart home needs Intelligence. For this, we will use the external DeepSeek server you built in our previous guide. This separates the heavy AI lifting from your Home Assistant server.
Ensure your Ollama server is running and accessible on your local network (e.g., http://192.168.1.50:11434). Test it from your Home Assistant machine's terminal:
If you get a JSON response, your brain is ready.
2. Install Home Assistant Add-ons
In Home Assistant, navigate to Settings > Add-ons > Add-on Store. We need to install three essential local services.
A. The Ears: Whisper (Speech-to-Text)
Install "Whisper". This converts your spoken audio into text. Using the "medium-int8" model is a good balance of speed and accuracy for 2026 hardware.
B. The Voice: Piper (Text-to-Speech)
Install "Piper". This generates the voice reply. It's incredibly fast and sounds surprisingly human. Pick a voice model you like.
C. The Trigger: openWakeWord
Install "openWakeWord". This listens 24/7 for a specific phrase (like "Hey Jarvis") to start recording. It's far more private than cloud options.
3. Connect the Brain to Home Assistant
Now we need to tell Home Assistant to send complex text queries to your DeepSeek server instead of trying to handle them itself.
- Go to Settings > Devices & Services > Add Integration.
- Search for and install "Ollama".
- URL: Enter the IP of your separate AI server (e.g.,
http://192.168.1.50:11434). - Model: Choose the model you downloaded (e.g.,
deepseek-r1:8b). - Prompt Template: This is crucial. You need to tell DeepSeek it is a smart home assistant and provide it context about your devices.
{{ ha_state }}
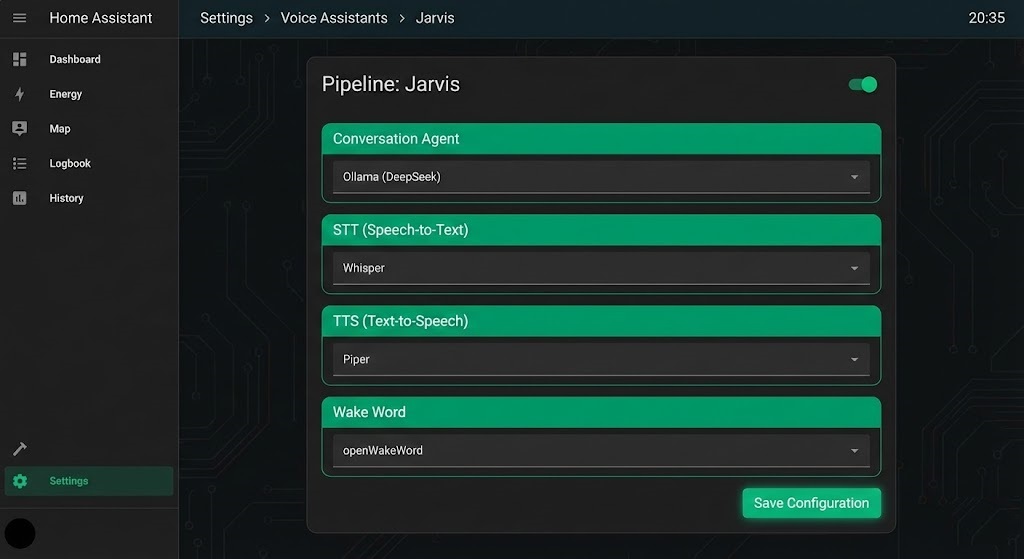
4. Build the Voice Pipeline
This is where we glue everything together. Go to Settings > Voice Assistants.
- Create a new Assistant called "Jarvis".
- Language: English.
- Conversation Agent: Select the Ollama (DeepSeek) integration you just added.
- Speech-to-Text: Select Whisper.
- Text-to-Speech: Select Piper.
- Wake Word: Select openWakeWord and choose your trigger phrase (e.g., "hey_jarvis").
Ensure your microphone device is selected at the top of the Voice Assistants page. Say "Hey Jarvis, turn on the lights." It should respond instantly.
Troubleshooting & FAQ
Jarvis is slow to respond (5+ seconds)
The Fix: Your AI server hardware might be struggling. Try using a smaller quantized model (like a 4-bit quantization instead of 8-bit) on your Ollama server, or ensure your network connection between Home Assistant and the AI server is wired (Ethernet).
Wake word triggers randomly
The Fix: In the openWakeWord add-on configuration, increase the "threshold" value. A higher value means it needs to be more confident that you said the phrase before activating.
Yes. Absolutely everything—listening, processing text, thinking, and speaking—happens on your local network hardware. You could unplug your modem and Jarvis would still work.
Yes, but it requires more setup. You need to integrate Music Assistant or Spotify into Home Assistant first. Then DeepSeek can understand commands like "Play jazz in the kitchen" by calling those services.